Sunday, January 31, 2021

Kendo Menu With DropDownList Example

This article is an example of the Kendo Menu and DropDownList Component. The framework used is the Kendo UI for jQuery. In this example, we are tasked to create a menu that has a drop down list option.
Here are the requirements:

  1. A search menu.
  2. The menu contains two type of searches. Simple and advance.
  3. The advance search has a type option list.

Here is our solution. You can edit the code below using any text editor but I prefer Visual Studio Code. Make sure you are connected to the Internet because the code pulls the Kendo library from the Telerik CDN. Take note that this is just a demonstration code and you'll need to purchase a license if you are going to use Kendo UI for jQuery for more than just evaluation purposes.

<!DOCTYPE html>
<html>
<head>
    <meta charset="utf-8"/>
    <title>Kendo UI Menu with DropDownList Example</title>

    <link rel="stylesheet" href="https://kendo.cdn.telerik.com/2020.2.617/styles/kendo.default-v2.min.css"/>

    <script src="https://code.jquery.com/jquery-1.12.4.min.js"></script>
    <script src="https://kendo.cdn.telerik.com/2020.2.617/js/kendo.all.min.js"></script>
</head>
<body>
  
  <ul id="menu">
    <li>Search
      <ul>
        <li>
          <div style="display: flex">
            <input placeholder="Simple search" type="text" class="k-textbox">&nbsp;
            <button class="k-primary" title="Execute the search">
              <span class="k-icon k-i-search"></span>
            </button>
          </div>
        </li>
        <li class="k-separator"></li>
        <li>
          <div>
            <input id="searchTypes"></br>
            <div style="display: flex">
              <input placeholder="Advance search" type="text" class="k-textbox">&nbsp;
              <button title="Execute the search">
                <span class="k-icon k-i-search"></span>
              </button>
            </div>
          </div>
        </li>
      </ul>
    </li>
  </ul>
<script>
$(document).ready(function() {
  $("#menu").kendoMenu({
    animation: false,
  });

  $("#searchTypes").kendoDropDownList({
    dataSource: {
      data: ["Type 1", "Type 2", "Type 3", "Type 4"],
    },
    open: function(e) {
      $("#menu").find("ul.k-group.k-menu-group")
        .css("overflow", "visible");
    }
  });
});
</script>
</body>
</html>

Open the HTML file in a browser and you should see an output similar to the one shown below.
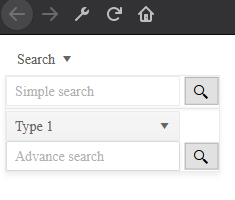
Kendo Menu with DropDownList


If we don't handle the CSS in the open event then it would look like this. Go ahead try it.
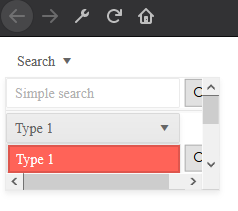
Kendo Menu with DropDownList not fully visible


When we handle the CSS in the open event then it will look the one below.

Kendo Menu with visible DropDownList

There you have it. A quick and simple example of how to use the Kendo Menu with DropDownList component.


Sunday, January 17, 2021

Kendo Diagram Double Click Example

This article is an example of the Kendo Diagram Component with a double click event handler. The framework used is the Kendo UI for jQuery. This example builds upon the Kendo Diagram Example. After we were tasked to create a link graph, we must now handle a double click event on a shape. Here are the requirements:

  1. Show the shape ID and Name when a shape is double clicked.
  2. Zoom level must not change on double click.

Here is our solution. You can edit the code below using any text editor but I prefer Visual Studio Code. Make sure you are connected to the Internet because the code pulls the Kendo library from the Telerik CDN. Take note that this is just a demonstration code and you'll need to purchase a license if you are going to use Kendo UI for jQuery for more than just evaluation purposes.

The two main points here are:

  1. By default, Kendo Diagram zooms in when we double click. So we capture the event in zoomStart and prevent it from propagating.
  2. Kendo Diagram does not provide a double click event API. So we had to bind it manually using jQuery and find the shape based on its position.
<!DOCTYPE html>
<html>
<head>
    <meta charset="utf-8"/>
    <title>Kendo UI Diagram Example</title>

    <link rel="stylesheet" href="https://kendo.cdn.telerik.com/2020.3.1118/styles/kendo.default-v2.min.css"/>

    <script src="https://code.jquery.com/jquery-1.12.4.min.js"></script>
    <script src="https://kendo.cdn.telerik.com/2020.3.1118/js/kendo.all.min.js"></script>
</head>
<body>
  
<div id="diagram"></div>
<script>
var $diagram = $('#diagram');
var diagram = $diagram.kendoDiagram({
    editable: {
        remove: false,
        resize: false,
        tools: false,
    },
    zoomRate: 0.5,
    zoomMax: 1.5,
    zoomMin: 0.6,
    dataSource: [
        {id:'king', name:'King'},
        {id:'queen', name:'Queen'},
        {id:'bishop', name:'Bishop'},
    ],
    connectionsDataSource:[
        {from:'king', to:'queen', label: '10%'},
        {from:'king', to:'bishop', label: '40%'},
        {from:'queen', to:'bishop', label: '55%'},
    ],
    layout: {
        type: 'force',
        nodeDistance: 200,
    },
    shapeDefaults: {
        type: 'circle',
        content: {
            template: '#= name #'
        },
        width: 70,
        height: 70,
        hover: {
            fill: 'Orange'
        },
        editable: {
            connect: false,
            tools: false,
        },
    },
    connectionDefaults: {
        type: 'polyline',
        editable: false,
        content:{
            template: '#= label#'
        }
    },
    zoomStart: function(e) {
        if (e.meta.type === 'doubleTap') {
            e.preventDefault();
        }
    }
}).data('kendoDiagram');

$diagram.unbind('dblclick');
$diagram.bind('dblclick', function(e) {
    var position = diagram.documentToModel({
        x: e.pageX,
        y: e.pageY,
    });
    var targetShape = shapeByPosition(position);
    if (targetShape) {
        alert(targetShape.dataItem.id + ': ' +
            targetShape.dataItem.name);
    }
});

function shapeByPosition(position) {
    var shapes = diagram.shapes;
    for (let i = 0; i < shapes.length; i++) {
        var shape = shapes[i];
        if (shape.bounds().contains(position)) {
            return shape;
        }
    }
}
</script>
</body>
</html>


Open the HTML file in a browser and you should see an output similar to the one shown below.

Kendo Diagram Double Click
Kendo Diagram Double Click Example


There you have it. A quick and simple example of how to use the Kendo Diagram component with a double click event handler.

Saturday, January 9, 2021

Kendo DropDownList Example

This article is an example of the Kendo DropDownList Component. The framework used is the Kendo UI for jQuery. In this example, we are tasked to create a drop down list.

Here are the requirements:

  1. Have a separator between the options.
  2. Don't show the "Select Option" text with the list.

Here is our solution. You can edit the code below using any text editor but I prefer Visual Studio Code. Make sure you are connected to the Internet because the code pulls the Kendo library from the Telerik CDN. Take note that this is just a demonstration code and you'll need to purchase a license if you are going to use Kendo UI for jQuery for more than just evaluation purposes.

<!DOCTYPE html>
<html>
<head>
    <meta charset="utf-8"/>
    <title>Kendo UI DropDownList Example</title>

    <link rel="stylesheet" href="https://kendo.cdn.telerik.com/2020.2.617/styles/kendo.default-v2.min.css"/>

    <script src="https://code.jquery.com/jquery-1.12.4.min.js"></script>
    <script src="https://kendo.cdn.telerik.com/2020.2.617/js/kendo.all.min.js"></script>
</head>
<body>
  
<input id="customers" style="width: 400px" />
<script>
    $(document).ready(function() {
        $("#customers").kendoDropDownList({
            dataTextField: "option",
              optionLabel: "Select Option",
            height: 400,
            dataSource: {
                data: [
                  {group: "group1", option: "Sum"},
                  {group: "group1", option: "Count"},
                  {group: "group1", option: "Average"},
                  {group: "group1", option: "More Aggregate Options"},
                  {group: "group2", option: "Index"},
                  {group: "group2", option: "% of Grand Total"},
                  {group: "group2", option: "More Calculation Options"},
                  {group: "group3", option: "Number Format"}
                ],
                group: { field: "group" }
            },
          open: function (e) {
           $('.k-group-header').css("display", "none");
           $('.k-group').css("display", "none");
           $('.k-list-optionlabel').css("display", "none");
          }
        });
    });
</script>

</body>
</html>

Open the HTML file in a browser and you should see an output similar to the one shown below.

Kendo DropDownList
Kendo DropDownList Example


If we don't handle the open event then it would look like this. Go ahead try it.

Kendo DropDownList
Kendo DropDownList


There you have it. A quick and simple example of how to use the Kendo DropDownList component.

Saturday, January 2, 2021

Kendo Diagram Example

This article is an example of the Kendo Diagram Component. The framework used is the Kendo UI for jQuery. In this example, we are tasked to create a link graph.

Here are the requirements:

  1. Zoomable
  2. Not editable
  3. Nodes must be movable
  4. Connections between nodes have labels

Here is our solution. You can edit the code below using any text editor but I prefer Visual Studio Code. Make sure you are connected to the Internet because the code pulls the Kendo library from the Telerik CDN. Take note that this is just a demonstration code and you'll need to purchase a license if you are going to use Kendo UI for jQuery for more than just evaluation purposes.


<!DOCTYPE html>
<html>
<head>
    <meta charset="utf-8"/>
    <title>Kendo UI Diagram Example</title>

    <link rel="stylesheet" href="https://kendo.cdn.telerik.com/2020.3.1118/styles/kendo.default-v2.min.css"/>

    <script src="https://code.jquery.com/jquery-1.12.4.min.js"></script>
    <script src="https://kendo.cdn.telerik.com/2020.3.1118/js/kendo.all.min.js"></script>
</head>
<body>
  
<div id="diagram"></div>
<script>
 $("#diagram").kendoDiagram({
    editable: {
        remove: false,
        resize: false,
        tools: false,
    },
    zoomRate: 0.5,
    zoomMax: 1.5,
    zoomMin: 0.6,
    dataSource: [
        {id:'king', name:'King'},
        {id:'queen', name:'Queen'},
        {id:'bishop', name:'Bishop'},
    ],
    connectionsDataSource:[
        {from:'king', to:'queen', label: "10%"},
        {from:'king', to:'bishop', label: "40%"},
        {from:'queen', to:'bishop', label: "55%"},
    ],
    layout: {
        type: 'force',
        nodeDistance: 200,
    },
    shapeDefaults: {
        type: 'circle',
        content: {
            template: '#= name #'
        },
        width: 70,
        height: 70,
        hover: {
            fill: 'Orange'
        },
        editable: {
            connect: false,
            tools: false,
        },
    },
    connectionDefaults: {
        type: 'polyline',
        editable: false,
        content:{
            template: '#= label#'
        }
    }
});
</script>
</body>
</html>

Open the HTML file in a browser and you should see an output similar to the one shown below.

Kendo Diagram Example
 

There you have it. A quick and simple example of how to use the Kendo Diagram component.