Monday, August 30, 2021

Kendo Listbox Item Select Issue Example

This article is an example of the Kendo Listbox Component. The framework used is Kendo UI for jQuery. In this example, we will demonstrate an item selection issue when we resize the list box which makes the horizontal scrollbar appear.

Let's demonstrate the problem. First of all, if the screen is wide enough then we will not see the UI problem. Let's resize and make the browser width smaller so that the horizontal scrollbar is displayed. On initial load, it all looks hunky dory. Our requirement is on initial load, all items are selected. Like so.

Kendo Listbox Item Select Issue
Kendo Listbox On Load

Now let's scroll to the right. Notice that the items are not fully selected. We don't see the letters because it is white. Like so.
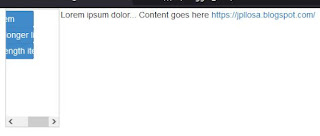
Kendo Listbox Item Select Issue

Here is our solution. You can edit the code below using any text editor but I prefer Visual Studio Code. Make sure you are connected to the Internet because the code pulls the Kendo library from the Telerik CDN. Take note that this is just a demonstration code and you'll need to purchase a license if you are going to use Kendo UI for jQuery for more than just evaluation purposes.

As per requirement, we need to select all items on initial load. So on dataBound we select all items and we also find the longest text and multiply it with our magic number 7 (this could be any number depending on your font size). The product is the maximum width of the longest text in pixels. We then set this maximum width to k-list when the column width is less than this value. Otherwise, we set the width to 100% as can be seen in the resizeContent function. Furthermore, we have made our list box responsive by binding resizeContent to the resize event. Don't call resizeContent to see the item select issue.

This is how it looks like with our solution. The items are now fully selected.

Kendo Listbox Item Select Issue
Kendo Listbox Item Select Issue Fixed

There you have it. A quick and simple example of how to fix the Kendo Listbox item select issue.

Wednesday, August 18, 2021

Kendo Chart with Filter Example

This article is an example of how to filter a Kendo Chart Component. The framework used is Kendo UI for jQuery. In this example, we learn a bunch of things. First, we will learn how to extend a Widget class to create our own custom widget. One reason why we create our own widget is when we would like to use it in our other projects. Second, triggering events so that our custom widget can handle the event. Lastly, utilizing the Kendo DataSource component to filter our Kendo Chart.

First off, we place our custom widget inside an immediately invoked function expression and pass in jQuery. We extend the base Kendo Widget class in the kendo.ui namespace. Next, we provide an init method. The element parameter is where we are initializing the widget to. The options are configuration values for our widget and are then merged to the base options. We add our custom UI code, _create and in order for the client code to get the filter when the Kendo Button is clicked, we trigger the attached event so that the client code can handle the event. Lastly, we add the widget to Kendo UI, plugin. Our widget is now available to use like all other Kendo UI widgets.

my-widget.js

In our HTML, we bind our array to a Kendo DataSource. We create our custom filter the same way we create other Kendo widgets and implement the code to handle the applyFilter event. And then we bind the dataSource to Kendo Chart.

kendo-chart-with-filter.html

This is how it looks like on initial load.

Kendo Chart with Filter
Kendo Chart with Filter - Initial Load

This is how it looks like filtered.

Kendo Chart with Filter
Kendo Chart with Filter - Filtered

There you have it. A quick and simple example of how to filter a Kendo Chart.

Saturday, August 7, 2021

Kendo Chart Custom Visual Image Example

This article is an example of creating a custom visual image in a Kendo Chart Component. The framework used is Kendo UI for jQuery. In this example, our requirement is to show an image when a chart hits a certain point. Say for example when the values hit below 30, it will show a life saver icon. Telling the user that the value needs to be looked into so to speak.

What we need to do is implement a function for the visual option. We call the createVisual() function to save us from computing where to put the label and icon. Looping through the visual.children and finding the Text nodeType will give us the bounding box (position) coordinates for our label and icon. When we have the coordinates, we utilise Kendo's drawing API to draw the label and icon and return it as a Group object.

Here is our solution. You can edit the code below using any text editor but I prefer Visual Studio Code. Make sure you are connected to the Internet because the code pulls the Kendo library from the Telerik CDN. Take note that this is just a demonstration code and you'll need to purchase a license if you are going to use Kendo UI for jQuery for more than just evaluation purposes.

Result:

Kendo Chart Custom Visual Image Example
Kendo Chart Custom Visual Image

There you have it. A quick and simple example of how to create custom visual image in Kendo Chart.