Showing posts with label kendo grid. Show all posts

Monday, October 11, 2021

Kendo Grid Persist Row Selection Example

This article is an example of a Kendo Grid row selection issue. The framework used is Kendo UI for jQuery. Let's begin.

In the persist row selection in this knowledge base article, https://docs.telerik.com/kendo-ui/knowledge-base/persist-row-selection-while-paging, it chooses the wrong rows after choosing the page and going back then Shift+Click a row. Below is the code from the knowledge base article.

Follow these steps to reproduce the row selection issue.

  1. On page 1, select Brazil (row 3). The Brazil row should be selected.
  2. Go to page 2 then back to page 1. Brazil is still selected. Well and good.
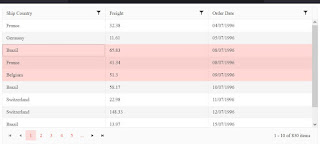
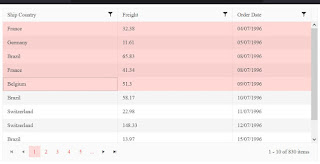
  3. Shift+Click Belgium, the selection now starts from row 1 to row 5 (France, Germany, Brazil, France, Belgium). Selected should be row 3 to 5 (Brazil, France, Belgium).

Kendo Grid Persist Row Selection Example
Kendo Grid Persist Row Selection Problem
Now that we have seen the problem, let's see the solution. Why is this happening? When we switched pages the grid no longer knows which row was focused previously. So what we do now is utilize the persistSelection option. Since we have the persistSelection, we no longer need to handle the change event. On dataBound, we find which rows were selected and set the focus to that row.

Here is our solution. You can edit the code below using any text editor but I prefer Visual Studio Code. Make sure you are connected to the Internet because the code pulls the Kendo library from the Telerik CDN. Take note that this is just a demonstration code and you'll need to purchase a license if you are going to use Kendo UI for jQuery for more than just evaluation purposes.

Output:

Kendo Grid Persist Row Selection Example
Kendo Grid Persist Row Selection Solution

There you have it. A quick and simple example of how to persist a row selection on a Kendo Grid.

Monday, July 12, 2021

Kendo Grid Copy Text Example

This article is an example of copying text in a Kendo Grid Component. The framework used is Kendo UI for jQuery. In this example, our requirement is to be able to copy text in a Kendo Grid when multiple selection is enabled.

This article is based on an answer I made in Stack Overflow - Kendo Grid UI: Enable custom text copy. When the selectable option is set to multiple or others, you can't select text over a mouse-drag action. So we have to handle the copy text operation. First off, we create a Kendo ContextMenu that targets the grid component. When the context menu is opened, we display the text via an input tag wherein the user can copy the text as he pleases.

Here is our solution. You can edit the code below using any text editor but I prefer Visual Studio Code. Make sure you are connected to the Internet because the code pulls the Kendo library from the Telerik CDN. Take note that this is just a demonstration code and you'll need to purchase a license if you are going to use Kendo UI for jQuery for more than just evaluation purposes.

You should see something like below when you run the program.

Kendo Grid Copy Text Example
Kendo Grid Copy Text

There you have it. A quick and simple example of how to copy a text from a Kendo Grid with selection features enabled.

Sunday, April 25, 2021

Kendo Grid Frozen Row Example

This article is an example of the Kendo Grid Component with a frozen row. The framework used is the Kendo UI for jQuery. In this example, our requirement is to freeze a row at the top of the grid. This is based on the https://docs.telerik.com/kendo-ui/knowledge-base/grid-frozen-rows example. Unfortunately, as of this writing, the grid does not produce the expected result when adding the following options:

  1. Resizable columns.
  2. Group by column.
  3. Show/hide columns.
  4. Filter by column.

Here is our solution. You can edit the code below using any text editor but I prefer Visual Studio Code. Make sure you are connected to the Internet because the code pulls the Kendo library from the Telerik CDN. Take note that this is just a demonstration code and you'll need to purchase a license if you are going to use Kendo UI for jQuery for more than just evaluation purposes.

The main difference here is our target row (frozen row) is appended to the table instead of the thead element. We also handle the columnHide and columnShow events to hide/show the frozen row's cell. And when a column is grouped, we remove the frozen row so that on dataBound, it is recreated. Recreating it aligns the columns.

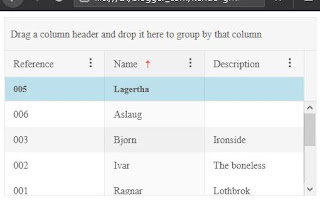
For this example, Reference 005 is the target row. At the start, you will see something like this:

Kendo Grid Frozen Row


Try sorting, grouping, hiding/showing columns, and filtering. Our target row remains where it is supposed to be.

Kendo Grid Frozen Row Grouped Column
Kendo Grid Frozen Row Grouped by Column

Kendo Grid Frozen Row Sorted Column

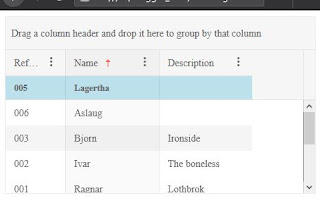
Kendo Grid Frozen Row Resized Column


There you have it. A quick and simple example of how to use the Kendo Grid with a frozen row.

Saturday, April 17, 2021

Kendo Grid Double Click Row Example

This article is an example of the Kendo Grid Component with a row double click event handler. The framework used is the Kendo UI for jQuery. As of this writing, there is no built-in double click event for Kendo Grid. We will have to use jQuery to handle a double click event on a row.

You can edit the code below using any text editor but I prefer Visual Studio Code. Make sure you are connected to the Internet because the code pulls the Kendo library from the Telerik CDN. Take note that this is just a demonstration code and you'll need to purchase a license if you are going to use Kendo UI for jQuery for more than just evaluation purposes.

Here is the example code. Just comment/uncomment some of the lines to see how it works.

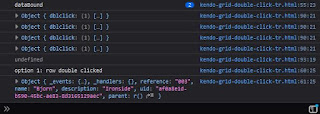
We have two options of adding the double click event handler. First is adding it inside the dataBound event of the grid. As shown in line 57. When we load the page and double click on a row, we should should see a console output like so:
Kendo Grid Double Click Row Example
Console Output 1

Option 1

As we can see, dataBound is called twice. First, when the grid is initialized and second, when a new data is inserted (line 83). The console output on line 90 shows the double click handler bound to the row or tr element. There is one double click handler per row. Now, imagine if we have a thousand rows. We will have a thousand double click handlers!!! One positive is that on the second dataBound event the first double click handlers were automatically destroyed otherwise rows two to four would have two double click handlers.

Option 1.a

Next, let's do option 1.a. Let's comment out line 58 to 62. and then uncomment line 75 to 78. Save and reload the page and double click on a row. Now, we are binding the event handler outside the dataBound event. The console output should look something like below:

Kendo Grid Double Click Row Example
Console Output 1.a

Double click is gone!! Comment out the addition of new data (line 83 to 87). Save and reload the page and double click on a row. There should be a row double clicked in the output:

Kendo Grid Double Click Row Example
Console Output 1.aa

So what happend? The dataBound event was not invoked again because we didn't add new data. Therefore, the event handlers were not torn down.

Option 2

Uncomment the addition of new data (line 83 to 87). Comment out the option 1 code and uncomment the option 2 code (line 67 to 71). Save and relaod the page and double click on a row. We should see something like this in the console output:

Kendo Grid Double Click Row Example
Console Output 2

Now it's back to two dataBound events as per usual. The difference now is no event handler is bound to tr elements. Our double click event handler is bound to tbody. And it's bound only once. Even if we have a thousand rows, we will only have one event handler. Goodie! We could put the binding code inside dataBound but do we want to unbind (off) and bind (on) every time a new row is added or removed? I don't think so. From the looks of it option 2 is the way to go.

Why does option 2 work? In short, delegated event handler. We provided a selector to the on method making it a deletegated event handler. The old way of doing this is the delegate method which is now deprecated but might still work. The handler is not called when the event occurs directly on the bound element, but only for descendants (inner elements) that match the selector. jQuery bubbles the event from the event target up to the element where the handler is attached (i.e., innermost to outermost element) and runs the handler for any elements along that path matching the selector.

Delegated event handlers have the advantage that they can process events from descendant elements that are added to the document at a later time. By picking an element that is guaranteed to be present at the time the delegated event handler is attached, you can use delegated event handlers to avoid the need to frequently attach and remove event handlers.

There you have it. A Kendo Grid double click row example. Happy coding.
Sunday, April 4, 2021

Kendo Grid Sticky Row Example

This article is an example of the Kendo Grid Component with a sticky row. The framework used is the Kendo UI for jQuery. In this example, we are tasked to make a particular row stick to the header so that it is always shown when the grid is scrolled. This is particularly useful when an important row is associated to something else shown on the screen that you want to highlight.

Here is our solution. You can edit the code below using any text editor but I prefer Visual Studio Code. Make sure you are connected to the Internet because the code pulls the Kendo library from the Telerik CDN. Take note that this is just a demonstration code and you'll need to purchase a license if you are going to use Kendo UI for jQuery for more than just evaluation purposes.

On dataBaound, we find the row we want to be sticky and add the necessary CSS to it. That's all there is to it.

For this example, Reference 003 is the important row. At the start, you will see something like this:

Kendo Grid Sticky Row
Kendo Grid Sticky Row in the Middle
 

After scrolling fully up, the important row sticks to the header and is always shown, like so:

Kendo Grid Sticky Row
Kendo Grid Sticky Row at the Top

There you have it. A quick and simple example of how to use the Kendo Grid with a sticky row.

Sunday, March 28, 2021

Kendo Menu and Grid Example

This article is an example of the Kendo Menu combined with the Kendo Grid. The framework used is the Kendo UI for jQuery. In this example, we are tasked to create a menu that disables its items depending on the selected row in the grid. It's is something like, you can't work on a row if you own it. Hence, the owner's name is disabled in the menu item.

Here is our solution. You can edit the code below using any text editor but I prefer Visual Studio Code. Make sure you are connected to the Internet because the code pulls the Kendo library from the Telerik CDN. Take note that this is just a demonstration code and you'll need to purchase a license if you are going to use Kendo UI for jQuery for more than just evaluation purposes.

Open the HTML file in a browser and you should see an output similar to the one shown below.

Kendo Menu and Grid
Kendo Menu and Grid Example

There you have it. A quick and simple example of how to use the Kendo Menu combined with Kendo Grid.