Showing posts with label postman. Show all posts

Monday, August 28, 2023

GraphQL with Postman Example

This article is an example of how to create GraphQL requests with Postman. We will be utilizing the public Star Wars GraphQL API for this practice.

GraphQL

What is GraphQL? graphql.org states that it is a query language for APIs and a runtime for fulfilling those queries with your existing data. It provides a complete and understandable description of the data in your API. Gives clients the power to ask for exactly what they need and nothing more. Makes it easier to evolve APIs over time. Enables powerful developer tools. Did that make sense? Maybe some examples might help.

GraphQL came to be because of the shortcomings of RESTful APIs. One of the issue with a RESTful API is that they overfetch or underfetch data. That means, a single request either gets too much or too little data. Another problem is you might need to hit multpile endpoints just to get the data that you want.

Enter GraphQL. You'll only need one endpoint, supply it with the query language data and receive only the data that you asked for. Another advantage is its type system. This typed schema ensures that we only ask for what's possible and provide clear and helpful error even before we send a request via tools (e.g. Postman).

There it is, a better succuessor to REST.

Configuring Postman

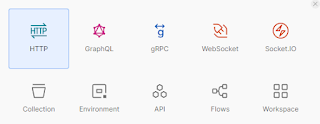
I'm using Postman for Windows v10.17.4. There are two ways of making a GraphQL request in Postman. First is the good old fashioned HTTP request and the other is the GraphQL request. Clicking New, you should be able to see something like below:
GraphQL with Postman
GraphQL New

HTTP Way

We'll use the public Star Wars GraphQL API for this example. We'll hit the graph endpoint, https://swapi-graphql.netlify.app/.netlify/functions/index with the query:


query Query {
  allFilms {
    films {
      title
    }
  }
}

To understand the query in more detail, we'll have to read the Star Wars Schema Reference. But this example is not about that. We requested all the Star Wars film titles. We got back something like below:

GraphQL with Postman
GraphQL HTTP

Things to note on the above image. The selected radio button is GraphQL. Next is the Schema Fetched text. This tells us that Postman will do type checking based on the schema and will offer suggestion and syntax checking (red line under the letter d of dir). Even before we send the request, we already know that it will cause an error.

GraphQL with Postman
GraphQL Context Suggestion
GraphQL with Postman
GraphQL Error Field

GraphQL Way

The GraphQL way is even better. We can create the query just by ticking the checkboxes. Thank you typed schema! Need I say more?

GraphQL with Postman
GraphQL Way

We can also do variables. Take note of the id of "A New Hope". We can pass in arguments like so:
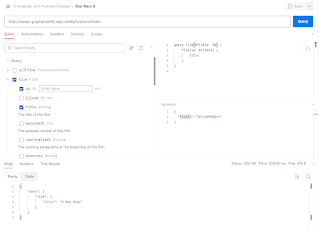
GraphQL with Postman
GraphQL Way Variable

GraphQL with Postman Summary

So far, we have only touched up on query. We haven't done any mutatation since the free public Star Wars API doesn't support it. But to explain it succinctly, query is fetching data while mutation is writing data. Congratulations! You have now taken the first few steps in using Postman for your GraphQL needs. You have learned to create a request. Add variables to vary your request. All done in just a few minutes. There you have it. A simple example of how to use GraphQL with Postman.

Thursday, March 30, 2023

Automate API Testing with Postman Example

This article is an example of how to automate API testing with Postman. We'll be utilising the code from Spring Boot Mockito Example. We won't be making changes to the code. The focus of this example is using Postman to do our automated API testing.

Requirements

Clone the project, github.com/jpllosa/tdd-mockmvc. After that, you can either load it into an IDE (e.g. Spring Tool Suite) then run it or you can straight up run it via command line (mvn spring-boot:run).

Of course, you'll need Postman. Get it here: Postman. As of this writing, you can download it for free.

API Testing

Groovy. Now, we are ready to do some API testing. Start up the MathFun web app and let's hit the endpoint! First off the bat is the Collection. Why create a collection? Other than grouping your API calls in a meaningful way, you can run a collection of API calls automatically! Hit the plus sign to create a collection. Let's name it Math Fun.

Automate API Testing with Postman

Things to note on the above image. The Pre-request Script tab is where JavaScript code is written that are ran before a request is sent. The Tests tab is where JavaScript code is written that are ran after a response is received. The Variables tab hold variables specific to the collection. The Runs tab contains a list of past API runs. The Run button (play icon) is where you can choose how to run your collection. The Pre-request and Tests tabs are also found on Requests, code here only applies to that request.

Create the Requests

You should see an Add request under the Math Fun collection or you can click on the three dots. Create "Request 1" with http://localhost:8080/get-gcf?firstNumber=12&secondNumber=16. Make sure your web app is running then send the request. You should see something like below after sending the request:

Create a Postman Request

Create two more requests with the following URLs:

  1. Request 2 - http://localhost:8080/get-gcf?firstNumber=0&secondNumber=6
  2. Request 3 - http://localhost:8080/get-gcf?firstNumber=16&secondNumber=8

Variables

Variables are particulary useful when you want to change something in a particular request (e.g. Cookie, Hostname, etc.). For this example you'll make the hostname a variable. This is useful when you want to test the API in different environments. You can go straight to the Variables tab and create one or you can double-click on the thing you want to make into a variable. Let's double-click on localhost and a "Set as variable" tooltip should pop up. Add a name, value and scope like so:

Set a Variable in Postman

Then set as a variable. Now, replace all localhost with {{hostname}}. Don't forget to save! Ctrl+S!

Running the Collection

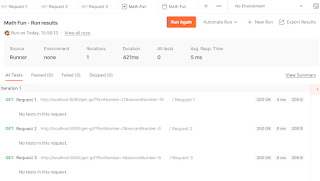
Running the collection is as simple as clicking the "Run Collection" button. You should see a report like below. If not, click on the graph icon whilst in the Past runs view. As you can see below there are no tests yet. Let's add some.

Postman Collection
Postman Collection

Adding Tests

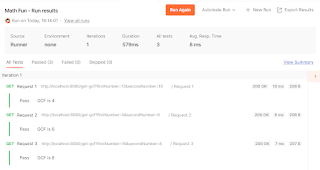
Go to the Tests tab and add the code below. Obviously, replace the title and value to the expected GCF (Greatest Common Factor). Request 1, GCF is 4. Request 2, GCF is 6. Request 3, GCF is 8. Run the collection again and you should see the test results like below. Try making the the tests fail by changing the expected number to see what failed tests look like.


pm.test("GCF is 4", function () {
    let jsonData = pm.response.json();
    pm.expect(jsonData.gcf).to.eql(4);
});
Postman API Test Result

The code above tells us that the test case name is "GCF is 4". We read the JSON response payload returned by the API endpoint. Then we assert the gcf value against our expected value.

Request Sequence

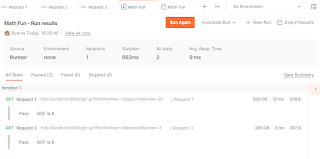
There are times when we need to skip a request because of an outcome. Say for example we are doing a questionnaire and if the user answers a yes/no, it shows another question (i.e. that is go to a end of questionnaire endpoint). In this example, you'll make Request 1 go straight to Request 3. It's just an additional one liner as seen below. The results will not show Request 2 being called.


pm.test("GCF is 4", function () {
    let jsonData = pm.response.json();
    pm.expect(jsonData.gcf).to.eql(4);
});

postman.setNextRequest("Request 3");
Set Next Postman Request

Automate API Testing with Postman Summary

Congratulations! You have now taken the first few steps in automating API testing with Postman. You have learned to create a request. Add variables to vary your request. Then grouped it into a collection, added tests on the response and modified the sequence of the requests. All done in just a few minutes. There you have it. A simple example of how to automate API testing with Postman.