This article is an example of the Kendo Menu and DropDownList Component. The framework used is the Kendo UI for jQuery. In this example, we are tasked to create a menu that has a drop down list option.
Here are the requirements:
- A search menu.
- The menu contains two type of searches. Simple and advance.
- The advance search has a type option list.
Here is our solution. You can edit the code below using any text editor but I prefer Visual Studio Code. Make sure you are connected to the Internet because the code pulls the Kendo library from the Telerik CDN. Take note that this is just a demonstration code and you'll need to purchase a license if you are going to use Kendo UI for jQuery for more than just evaluation purposes.
<!DOCTYPE html>
<html>
<head>
<meta charset="utf-8"/>
<title>Kendo UI Menu with DropDownList Example</title>
<link rel="stylesheet" href="https://kendo.cdn.telerik.com/2020.2.617/styles/kendo.default-v2.min.css"/>
<script src="https://code.jquery.com/jquery-1.12.4.min.js"></script>
<script src="https://kendo.cdn.telerik.com/2020.2.617/js/kendo.all.min.js"></script>
</head>
<body>
<ul id="menu">
<li>Search
<ul>
<li>
<div style="display: flex">
<input placeholder="Simple search" type="text" class="k-textbox">
<button class="k-primary" title="Execute the search">
<span class="k-icon k-i-search"></span>
</button>
</div>
</li>
<li class="k-separator"></li>
<li>
<div>
<input id="searchTypes"></br>
<div style="display: flex">
<input placeholder="Advance search" type="text" class="k-textbox">
<button title="Execute the search">
<span class="k-icon k-i-search"></span>
</button>
</div>
</div>
</li>
</ul>
</li>
</ul>
<script>
$(document).ready(function() {
$("#menu").kendoMenu({
animation: false,
});
$("#searchTypes").kendoDropDownList({
dataSource: {
data: ["Type 1", "Type 2", "Type 3", "Type 4"],
},
open: function(e) {
$("#menu").find("ul.k-group.k-menu-group")
.css("overflow", "visible");
}
});
});
</script>
</body>
</html>
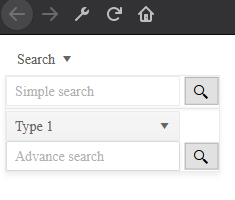
Open the HTML file in a browser and you should see an output similar to the one shown below.
 |
| Kendo Menu with DropDownList |
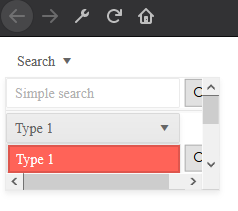
If we don't handle the CSS in the
open event then it would look like this. Go ahead try it. |
| Kendo Menu with DropDownList not fully visible |
When we handle the CSS in the open event then it will look the one below.
 |
| Kendo Menu with visible DropDownList |
There you have it. A quick and simple example of how to use the Kendo Menu with DropDownList component.