Thursday, March 30, 2023

Automate API Testing with Postman Example

This article is an example of how to automate API testing with Postman. We'll be utilising the code from Spring Boot Mockito Example. We won't be making changes to the code. The focus of this example is using Postman to do our automated API testing.

Requirements

Clone the project, github.com/jpllosa/tdd-mockmvc. After that, you can either load it into an IDE (e.g. Spring Tool Suite) then run it or you can straight up run it via command line (mvn spring-boot:run).

Of course, you'll need Postman. Get it here: Postman. As of this writing, you can download it for free.

API Testing

Groovy. Now, we are ready to do some API testing. Start up the MathFun web app and let's hit the endpoint! First off the bat is the Collection. Why create a collection? Other than grouping your API calls in a meaningful way, you can run a collection of API calls automatically! Hit the plus sign to create a collection. Let's name it Math Fun.

Automate API Testing with Postman

Things to note on the above image. The Pre-request Script tab is where JavaScript code is written that are ran before a request is sent. The Tests tab is where JavaScript code is written that are ran after a response is received. The Variables tab hold variables specific to the collection. The Runs tab contains a list of past API runs. The Run button (play icon) is where you can choose how to run your collection. The Pre-request and Tests tabs are also found on Requests, code here only applies to that request.

Create the Requests

You should see an Add request under the Math Fun collection or you can click on the three dots. Create "Request 1" with http://localhost:8080/get-gcf?firstNumber=12&secondNumber=16. Make sure your web app is running then send the request. You should see something like below after sending the request:

Create a Postman Request

Create two more requests with the following URLs:

  1. Request 2 - http://localhost:8080/get-gcf?firstNumber=0&secondNumber=6
  2. Request 3 - http://localhost:8080/get-gcf?firstNumber=16&secondNumber=8

Variables

Variables are particulary useful when you want to change something in a particular request (e.g. Cookie, Hostname, etc.). For this example you'll make the hostname a variable. This is useful when you want to test the API in different environments. You can go straight to the Variables tab and create one or you can double-click on the thing you want to make into a variable. Let's double-click on localhost and a "Set as variable" tooltip should pop up. Add a name, value and scope like so:

Set a Variable in Postman

Then set as a variable. Now, replace all localhost with {{hostname}}. Don't forget to save! Ctrl+S!

Running the Collection

Running the collection is as simple as clicking the "Run Collection" button. You should see a report like below. If not, click on the graph icon whilst in the Past runs view. As you can see below there are no tests yet. Let's add some.
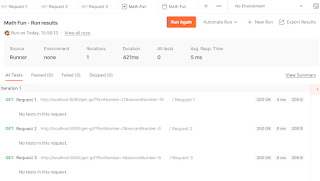
Postman Collection
Postman Collection

Adding Tests

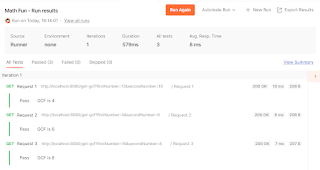
Go to the Tests tab and add the code below. Obviously, replace the title and value to the expected GCF (Greatest Common Factor). Request 1, GCF is 4. Request 2, GCF is 6. Request 3, GCF is 8. Run the collection again and you should see the test results like below. Try making the the tests fail by changing the expected number to see what failed tests look like.


pm.test("GCF is 4", function () {
    let jsonData = pm.response.json();
    pm.expect(jsonData.gcf).to.eql(4);
});
Postman API Test Result

The code above tells us that the test case name is "GCF is 4". We read the JSON response payload returned by the API endpoint. Then we assert the gcf value against our expected value.

Request Sequence

There are times when we need to skip a request because of an outcome. Say for example we are doing a questionnaire and if the user answers a yes/no, it shows another question (i.e. that is go to a end of questionnaire endpoint). In this example, you'll make Request 1 go straight to Request 3. It's just an additional one liner as seen below. The results will not show Request 2 being called.


pm.test("GCF is 4", function () {
    let jsonData = pm.response.json();
    pm.expect(jsonData.gcf).to.eql(4);
});

postman.setNextRequest("Request 3");
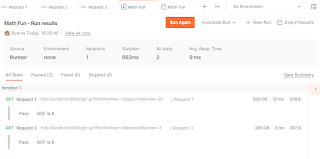
Set Next Postman Request

Automate API Testing with Postman Summary

Congratulations! You have now taken the first few steps in automating API testing with Postman. You have learned to create a request. Add variables to vary your request. Then grouped it into a collection, added tests on the response and modified the sequence of the requests. All done in just a few minutes. There you have it. A simple example of how to automate API testing with Postman.

Wednesday, March 1, 2023

Spring Session with Redis Example

In this article, we will talk about Spring session with Redis. We will demonstrate the difference between maintaining a session with HttpSession versus a session with Redis. Why would we want our session to be backed with Redis? Read on and we'll find out why. By the way, Spring session can also persist data using JDBC, Gemfire, or MongoDB.

Overview

Offloading session management from the servlet container (e.g. Tomcat's HTTP session) because of its limitations and eating up of server memory are some reasons we want to persist session data somewhere else. The most likely reason you'ld want to use Spring session with Redis is when you are scaling up. For example, you have multiple instances of a microservice running behind a load balancer and you'ld want to keep track of session state. Why have multiple instances? Because you want zero downtime of your service. With Redis, our session data can be shared between multiple microservices. By persisting sessions, multiple application instances can serve the same session and individual instances can crash without impacting other application instances.

Redis

I will not be providing instructions on how to set up Redis on your local machine. For that, I'll point you to Redis and make your way to the Get Started section. I'm using Windows 10 so I followed the Install on Windows instructions. I also had to set up my Windows Subsystem for Linux and got Ubuntu running on my local machine. In the end and by default, your Redis server should be running on port 6379 and you should be able to ping it. You should have something like below:

Spring Session with Redis
Redis Running

Spring Session with Redis Project

I will not provide instructions on how to create this project as well. My focus will be demostrating HttpSession versus Spring session with Redis. Anyway, if you want to create the project, you can follow the steps from my previous blogs (e.g. Spring Boot MockMvc Example). Here is what your Spring Initialzr would look like:

Spring Session with Redis
Spring Initializr

Here is the finished project, clone it from github.com/jpllosa/spring-session-redis.

@RestController


package com.blogspot.jpllosa.controller;

import org.springframework.http.HttpEntity;
import org.springframework.http.HttpStatus;
import org.springframework.http.ResponseEntity;
import org.springframework.web.bind.annotation.GetMapping;
import org.springframework.web.bind.annotation.PostMapping;
import org.springframework.web.bind.annotation.RestController;
import org.springframework.web.bind.annotation.RequestBody;

import javax.servlet.http.HttpSession;

import com.blogspot.jpllosa.model.UserData;

@RestController
public class HttpSessionController {

	@PostMapping("/save-to-http-session")
	public HttpEntity saveToHttpSession(@RequestBody UserData userData, HttpSession httpSession) {
		httpSession.setAttribute("userData", userData);
		return new ResponseEntity<>("", HttpStatus.ACCEPTED);
	}
	
	@GetMapping("/get-from-http-session")
	public HttpEntity getFromHttpSession(HttpSession httpSession) {
		return new ResponseEntity<>((UserData) httpSession.getAttribute("userData"), HttpStatus.OK);
	}
}

This is where all the action happens. Our microservice is pretty simple really. It accepts user data via an HTTP POST then we can send it back via an HTTP GET if it was saved. The response to a successful POST is a 202, meaning it was accepted.

Background

In our demonstration, we will run two instances of our microservice. MS 80, microservice on port 8080 and MS 81, microservice on port 8081. We'll pretend both are behind a load balancer. A network load balancer will decide where in coming requests go to which microservice. But we won't actually have a load balancer.

Tomcat HTTP Session

We'll need to comment out a few bits in the configuration. And just to be sure, we will stop the Redis server. To stop the server execute sudo service redis-server stop then you should see this message "Stopping redis-server: redis-server.". Comment out spring.session.store-type=redis in your application.properties and comment out the two Redis dependencies in you POM, like so:


<!--
<dependency>
	<groupId>org.springframework.boot</groupId>
	<artifactId>spring-boot-starter-data-redis</artifactId>
</dependency>
<dependency>
	<groupId>org.springframework.session</groupId>
	<artifactId>spring-session-data-redis</artifactId>
</dependency>
-->

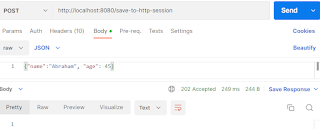
Open two command prompts/terminals and run MS 80 on one and MS 81 on the other. So that's mvn spring-boot:run -Dspring-boot.run.arguments=--server.port=8080 for MS 80 and mvn spring-boot:run -Dspring-boot.run.arguments=--server.port=8081 for MS 81. You should see something like 2023-02-23 16:27:13.547 INFO 25148 --- [ restartedMain] o.s.b.w.embedded.tomcat.TomcatWebServer : Tomcat initialized with port(s): 8081 (http). Of course 8080 will show for MS 80. Now, let's POST some user data. Let's send a POST via Postman to MS 80 like so:

Spring Session with Redis
HTTP POST to MS 80

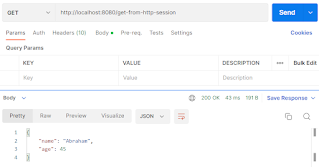
Now, let's check if our user data has persisted on both microservices. Let's do a GET on MS 80 and 81, like so:

Spring Session with Redis
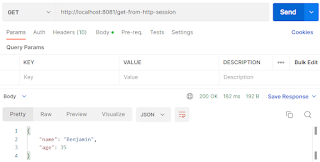
HTTP GET from MS 80
Spring Session with Redis
HTTP GET from MS 81

As you can see, only MS 80 returned the user data. Now, do you see the problem if we had to maintain session state between multiple instances? Only one MS maintained the state. Imagine if we were going to shutdown or restart MS 80 to update it or something, the session data will be lost. What if the session data was banking transaction? Oh dear!

Spring Session with Redis

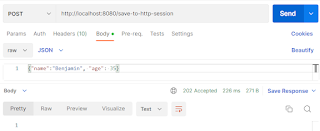
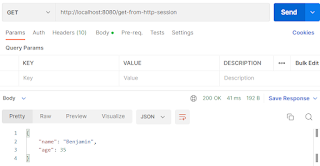
Now the fun part. Start the Redis server, sudo service redis-server start. Then undo the comments you made on your POM and application.properties. This should make your app Redis ready. With all that done, restart MS 80 and MS 81. So that's Ctrl+C then execute the maven command again as mentioned above. Let's do the POST again on MS 80 and do a GET on MS 80 and 81. Now the GET response will show the user data like so:

Spring Session with Redis
HTTP POST to MS 80 with Redis
Spring Session with Redis
HTTP GET from MS 80 with Redis
Spring Session with Redis
HTTP GET from MS 81 with Redis

There you have it. MS 80 and MS 81 are sending back the user data information. The magic that caused it all is spring.session.store-type=redis in your application.properties. Thanks to Spring Boot, a lot of steps have been done for us with just a single line in the application properties file. What did Spring Boot do for us? It applied a configuration that is equivalent to adding an @EnableRedisHttpSession to a class. This created a Spring bean with the name of springSessionRepositoryFilter that implements Filter. The filter is in charge of replacing the HttpSession implementation to be backed by Spring Session. Then Spring Boot automatically created a RedisConnectionFactory that connects Spring Session to a Redis Server on localhost on port 6379 (default port).

In a production environment, I would recommend to add more configuration and/or create a configuration class annotated with @EnableRedisHttpSession for more fine grained control over a session. Here are some of the configurations you can add:

  1. server.servlet.session.timeout= # Session timeout. If a duration suffix is not specified, seconds is used.
  2. spring.session.redis.flush-mode=on_save # Sessions flush mode.
  3. spring.session.redis.namespace=spring:session # Namespace for keys used to store sessions.
  4. spring.redis.host=localhost # Redis server host.
  5. spring.redis.password= # Login password of the redis server.
  6. spring.redis.port=6379 # Redis server port.

There you have it. Hope you had much fun playing with Spring Session with Redis, I know I did.