This article is an example of the Kendo Grid Component with a row double click event handler. The framework used is the Kendo UI for jQuery. As of this writing, there is no built-in double click event for Kendo Grid. We will have to use jQuery to handle a double click event on a row.
You can edit the code below using any text editor but I prefer Visual Studio Code. Make sure you are connected to the Internet because the code pulls the Kendo library from the Telerik CDN. Take note that this is just a demonstration code and you'll need to purchase a license if you are going to use Kendo UI for jQuery for more than just evaluation purposes.
Here is the example code. Just comment/uncomment some of the lines to see how it works.
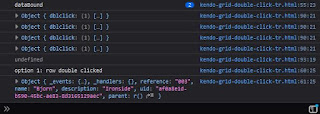
We have two options of adding the double click event handler. First is adding it inside the dataBound event of the grid. As shown in line 57. When we load the page and double click on a row, we should should see a console output like so:
Option 1
As we can see, dataBound is called twice. First, when the grid is initialized and second, when a new data is inserted (line 83). The console output on line 90 shows the double click handler bound to the row or tr element. There is one double click handler per row. Now, imagine if we have a thousand rows. We will have a thousand double click handlers!!! One positive is that on the second dataBound event the first double click handlers were automatically destroyed otherwise rows two to four would have two double click handlers.
Option 1.a
Next, let's do option 1.a. Let's comment out line 58 to 62. and then uncomment line 75 to 78. Save and reload the page and double click on a row. Now, we are binding the event handler outside the dataBound event. The console output should look something like below:
Double click is gone!! Comment out the addition of new data (line 83 to 87). Save and reload the page and double click on a row. There should be a row double clicked in the output:
So what happend? The dataBound event was not invoked again because we didn't add new data. Therefore, the event handlers were not torn down.
Option 2
Uncomment the addition of new data (line 83 to 87). Comment out the option 1 code and uncomment the option 2 code (line 67 to 71). Save and relaod the page and double click on a row. We should see something like this in the console output:
Now it's back to two dataBound events as per usual. The difference now is no event handler is bound to tr elements. Our double click event handler is bound to tbody. And it's bound only once. Even if we have a thousand rows, we will only have one event handler. Goodie! We could put the binding code inside dataBound but do we want to unbind (off) and bind (on) every time a new row is added or removed? I don't think so. From the looks of it option 2 is the way to go.
Why does option 2 work? In short, delegated event handler. We provided a selector to the on method making it a deletegated event handler. The old way of doing this is the delegate method which is now deprecated but might still work. The handler is not called when the event occurs directly on the bound element, but only for descendants (inner elements) that match the selector. jQuery bubbles the event from the event target up to the element where the handler is attached (i.e., innermost to outermost element) and runs the handler for any elements along that path matching the selector.
Delegated event handlers have the advantage that they can process events from descendant elements that are added to the document at a later time. By picking an element that is guaranteed to be present at the time the delegated event handler is attached, you can use delegated event handlers to avoid the need to frequently attach and remove event handlers.
There you have it. A Kendo Grid double click row example. Happy coding.


No comments:
Post a Comment